Friday, January 13, 2012

From Trash to Treasure Tutorial: Mid-Century Modern End Table


Here's a mid-century end table I picked up at a thrift store. I don't know why, but I really like these old retro tables. They're all over the place at thrift stores, too. Since this was my first one, I got a cheap, laminate model for practice.


The shiny laminate was THICK, so I had to really get in there with the sander. 


Since the wood wasn't that high of a quality, I decided to paint rather than stain it; 
so out came the primer!


It took more coats than a normal piece because of the laminate, 
but I went with some retro-green tones that would restore it's retro design.


If you're in the Pittsburgh area & interested in purchasing this end table, please contact me at this blog or email TheVintageMagi@gmail.com. 


"It was more than discovering something that I loved to do - 
It was discovering someone I had always been." 
 ~ Natalie ;-*
Follow Me on Pinterest


Thursday, January 12, 2012

From Trash to Treasure Tutorial: Solid Wood Shelves

Here are some free shelves I picked up, after a quick rough sanding.


More sanding & primed:


Finally, a few coats of paint, decorated, & put in my dining room!


UPDATE!!!!!!!

So I think that the color was too dark & made the room look cluttered. 
Instead, I've decided to get away from the mix-matchy look I thought 
I liked for awhile & change to a more fresh & clean white look for my downstairs. 

Downstairs they went for priming...


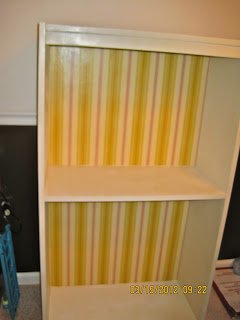
I picked out some wall paper for the back of the inside that would go with my 
main level color scheme & decided to paint them with 
Rust-Oleum Heirloom White spray paint.


Even though the wall paper had that postage stamp self-stick adhesive on the back, 
I used Mod Podge to make sure it was extra secure. 
Then, I adhered the wall paper to the back of the shelves. 


I coated the outside with Mod-Podge as well to protect the wall paper 
& give a uniform finish. 


After everything was dry, I used 
Rust-Oleum semi-gloss polyurethane spray 
to seal everything.

Then they went upstairs & were reassembled.


I've started putting them back together & will post those pictures soon!


"It was more than discovering something that I loved to do - 
It was discovering someone I had always been." 
 ~ Natalie ;-*
Follow Me on Pinterest


From Trash to Treasure Tutorial: Desk Chair, Entryway Stool, and Plant Stand

1) Desk Chair

This chair was free find.

Originally, it was a lighter natural wood that I didn't like. 
I forgot to take pictures before I started this chair, 
but here it is after it's first coat of paint. 


That is the original seat, which was a beat-up fake leather. 
I took the seat off the chair, left the fake leather on, 
& simply covered it using the leg of a pair of stretchy khaki pants
 that I had ripped in the knee (I'm sort of clumsy, haha). 

I stretched the khaki over the seat & secured it underneath with a staple gun. 
Then, I finished the coats of paint & reattached the seat. 
I want to sew a pillow out of the other piece of khaki & will post pictures when I do.


UPDATE: I sewed the pillow in an envelope style using the other piece of the khaki pant legs for the front & two pieces of floral fabric that is the same tone as the red in the room. 

There was also a homemade afghan that on of my husband's 
Great Aunts made that went along with the look of the chair.


A large view of the corner of the living room. I love the vintage telephone, 
& you may recognize the line painting on the wall from an earlier post, 


2) Entryway Stool 


While I had the burgundy paint out, I decided to refinish a stool that I found while digging for buried treasure! It was used outside & left by the previous owners of our house behind a shed under our deck.


After a lot of scrubbing, a few coats of paint, & a cushion I had 
(because it's ties fell off), it's now a nice seat where guests 
can remove their shoes in our entryway 
(for the time-being because I have a new piece 
I'm working on now to put in this space). 


3) Plant Stand 


Again, silly me, I forgot to take a before picture of this one. 
It had been another free find, once an old plain wood finish with lots of holes. 
I think it used to be a high-chair because of where the holes were 
& it's also very narrow & tall. I used wood filler & white paint 
to turn it into a plant stand. 

I am planning on decoupaging this chair with some leaves or floral art or fabric. I'll be sure to post pictures after I do.


"It was more than discovering something that I loved to do - 
It was discovering someone I had always been." 
 ~ Natalie ;-*
Follow Me on Pinterest

From Trash to Treasure Tutorial: Handmade Ski Decor

These are some skis I refinished for my brother-in-law for Christmas. 
My sister & he built their dream home in a popular ski destination 
in the Laurel Mountains of Pennsylvania.

Here they are in my workshop after sanding. 


After some stuff was removed from them & they were sanded, I used wood filler 
to fill in the holes & scratches, then stained them & painted 
"Stone Family Lodge Est. 2009' 
on them (2009 was the year they built their home) using black acrylic paint. 
On each mitten, I used a metallic silver paint pen 
to paint the names of each family member. 
Finally, I coated them with polyurethane to seal it all.

Here they are all finished for the gift exchange on Christmas Eve.


"It was more than discovering something that I loved to do - 
It was discovering someone I had always been." 
 ~ Natalie ;-*
Follow Me on Pinterest