Thursday, January 26, 2012

From Trash to Treasure Tutorial: Matching Coffee and End Tables

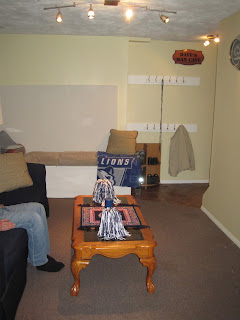
This project got started because I fixed up our basement after we moved in to our new house. It had been a lime green color & was so bright, it had to go! The linoleum in the entry from the garage was also black & white checker, which was not going to match our navy blue furniture that goes in our Penn State "Man Cave." Here are some before & after pictures.


I'll show more before & after pictures of the room, but now on to the tables. I have had these same tables since my first grown-up apartment, & before that it was in my parent's house for a decade or maybe more. This was the second refinishing project in my house, which made me realize that the first time wasn't just a fluke & I may actually be talented at this sort of thing! They were covered with beverage rings & scratches, but they're solid pieces of oak furniture, & I decided that I'd try to give them new life.

Here is the coffee table before 
(the first picture is before I painted the green walls, the other 3 are after):


 Coffee table after:

End table before:


End table after:


The rest of the basement after:


"It was more than discovering something that I loved to do - 
It was discovering someone I had always been." 
 ~ Natalie ;-*
Follow Me on Pinterest

From Trash to Treasure Tutorial: Decorative Accessories

1) Framed Fabric Display Shelves

I found these shelves at a thrift store near a Target that receives a lot of new merchandise whose packaging may have been damaged or were returned & could not be restocked. 
They were brand new, never used, & white when I brought them home. I wanted to 
use them in our entryway next to our formal living room, so I rubbed the corners 
with a little wax & painted them, using a dry brush technique to give them an 
antiqued look, the same color as the accent wall in the living room.

Rather than putting pictures in the frames, I framed pieces of fabric with satin ribbon 
going down the middle. I reversed the colors in each, displaying brown fabric with 
green ribbon in one, & green fabric with brown ribbon in the other.
2) Dry-brushed Picture Frames

In the same area as the shelves, I wanted to hang some pictures that were special. 
One is a photo from our engagement & another is a print of a church that looks 
similar to the church I attended when I was growing up. I dry-brushed the frames 
with shades of green to match the rest of the decor.
Here is a picture of the entryway at this moment. It won't be staying this way for 
long because I'm still working on the entryway cabinet in an earlier post, 
"From Trash to Treasure: Entryway Cabinet."


3) Antique Lamp

I found this lamp at my favorite thrift store.

After some cleaning,

4) Clustered Mirrors Display

I found mirrored candle holders at the thrift store for $0.50 a piece. I decided that they would make beautiful mirrored wall art. I attached plate hangers that you can buy at any craft store (or may even be able to find in any other type of store where they sell hooks or wall-mounting hardware) & laid them out on the floor first to figure out how they would go on the wall. Then I hung them & voila! It's like an expensive mirror cluster that's sold for $30 at Bed Bath & Beyond,  $50 at Pier 1, & as much as $250 at Pottery Barn for the cost of only the mirrors & hangers which came to less than $10.

This was such a good & inexpensive idea, that I'll definitely be keeping my eyes out 
for more mirrors & other things that can be hung on the wall as a cluster of art. 
I've always hung plates in my kitchen &/or dining room. It's such an easy way 
to decorate, & since it's all for the cost of the plate hangers, you just can't beat 
the awesome price & convenience! That makes me think that I need to make 
a post about decorating with everyday things already in your home.

5) Tacky Mirror Makeover


"It was more than discovering something that I loved to do - 
It was discovering someone I had always been." 
 ~ Natalie ;-*
Follow Me on Pinterest

From Trash to Treasure Tutorial: Little Household Furniture Projects

1) Bathroom Stool 

BEFORE

I picked this stool at a thrift store that's near a Target store 
& gets a lot of new, slightly damaged product. 

I needed a stool for my son's bathroom so I had a place to sit comfortably while he bathes. 
I sanded & painted it a sage green to match the color scheme of his bathroom.


2) Wooden Stand

This was a free find. I forgot to get a before picture, 
but it was all banged up & needed some TLC. 
I sanded & primed it as shown in the pictures below.


I painted it white for now & installed a board in the bottom. 
I'm probably going to change the bottom later, but for now this 
scrap piece in my garage functions fine. This is how it looks now, 
even if it may change once we're sure how it's going to be used.


3) Small Wooden Shelving Unit

These were a Target purchase that I've had for a long time. 
They were cheap, white, made of MDF & really didn't fit 
anywhere in our new home the way they were. 

I didn't take an actual 'before' picture, but I was able to find of 
how they originally looked when they were in our old house.


I had to scuff them up a little bit & then painted them with a dark reddish-brown, 
high-gloss paint. Because they were so light going to a dark color, 
it took a lot of coats. I painted them both exactly the same, 
but this is a shot of the same one, now in my living room.


This next table was also made of MDF & was the kind of flimsy little table that could 
be put bed-side or in a hall, but could not take any heavy duty use. It would also 
be covered with a small round tablecloth to hide the plain, grainy, & 
cheap-looking MDF; which is what I had done prior to it's makeover. 
I had it serving as a stand for our keurig coffee maker in our dining room.

Because it is made of MDF, it was already a rough surface to paint so I didn't have 
to sand it. I just painted it with a few coats of brown paint & moved it back 
to the dining room, where it's now a side table for my husband's desk.
I put a pretty maple leaf place mat on top to protect the top from
scuffs & match it to the decor of the room.


"It was more than discovering something that I loved to do - 
It was discovering someone I had always been." 
 ~ Natalie ;-*
Follow Me on Pinterest